Wednesday, September 17, 2014

Making a Home


All of my current projects have been to attempt making my apartment look less like a college dorm room :P. I've been doing projects like painting (I'm not all too artistic, so this was a daring task for me) and my next project is sewing curtains. Pinterest is a glorious place when you're looking for some home DIY projects, let me tell you. The painting project that I attempted can be found here on the REFINERY29 blog. They give a list of all the materials needed, and show step by step how to undertake this project. Here is my result for my living room:


 I wasn't so sure about it when I was done, but the more I look at it, the more I like it. It's certainly not perfect, but it'll do. And since it took about 2 hours to put all the painters tape on, I definitely will not be scratching it!

I found another simple idea for a painting on Pinterest that I decided to use for my bathroom. It was only a picture I found, but all you have to do is use painters tape to make a couple X's on a canvas. Then just paint around the tape, let it dry and pull the tape off. Voila! You get this:


My next project is to make some curtains for my living room. I found this fantastic fabric at Joann Fabrics by Patty Young:


I'm trying to keep the color scheme in my living room to blues and oranges (though I just realized that according to Joann's website, they say this fabric has red flowers; apparently I'm color blind, I could have sworn that they were a bright orange, whoops).

In other news, I forgot to mention that I bought a new sewing machine!!! I love love *love* it! It's a Janome DC5100. I purchased mine off of Amazon where my link goes to; being a prime member, free shipping is a wonderful perk.

I have a friend that is getting married in a couple weeks! I was honored to be invited to her bridal shower and with my new sewing machine, I was able to make these for her:


Pot holders are always a useful gift, and personalize them and they become even better :). I'm looking forward to being a part of their special day in just a little over a week!

And for my final thought, I'm going shopping for a wedding dress tomorrow!!!!!! I'm so excited!! Wish me luck! :)

Tuesday, July 29, 2014

I'm Not Dead!!


Sooo, it's been a while....like quite a while. You know how it goes; life gets busy, the projects start backing up. Well, the blog project is definitely one that slipped. For that I apologize to all of you out there that missed my posts (yes, we're going to pretend that you did to make me feel better).

So you ask me, "What have you been up to that kept you away from your blog?". Well let me tell you...


I'M ENGAGED!!!!!

That's right folks, it finally happened! I am currently engaged to my best friend, and will soon be proud to call myself his wife (well soonish). It's a tad weird and confusing at the moment since we live an hour and half away from each other, so one person has to move their entire life. But, it is being configured and it's super exciting and I'm super uber happy :D. The other big change is that I will be moving! I have been living with my wonderful parents that allowed their college graduate to come back home and mooch off of them ;), but I'll be moving into my own apartment in 8 days! Yep, I really just said 8 days. So a lot is changing in my world...but don't worry, the crafting is still happening! And now I have more things to craft because I have an apartment and a wedding to prepare for!!

Here are some projects that I've been working on...


This is a dresser that I repainted. Before being painted it looked like this. This is a different shape, but you get the idea. I have an entire set of this French Provincial furniture in my room, and I've decided to repaint them to give them some new life. This is the only piece that I have completed so far, I still have a larger chest of drawers and my bed to do. Some tutorials that I found to help in my painting ventures are LifeLoveDIY and Centsational Girl. For mine I did prime it first, and I used the clear wax at the end for sealing.

A project that I completed is a doily made with lace size string. If you haven't seen the crochet hook used for lace string, check it out, it will blow your mind. I made this doily for my fiance's mom for her birthday. It took months and months to make, but I absolutely love how it turned out!!! And so did she :).


Another lace doily that I'm still working on is for my mom. I've been working on it for quite some time, and it's still going to take quite a bit more time. When it's done it will have a diameter of 26 inches. The doily above has a diameter of 14 inches....The patterns for both of these doilies is in the Crochet World Spring 2014 Edition. For some reason I cannot find a link to that edition, very strange...


And the note I will leave you with....I bought a new sewing machine!!! Like *new* new!! The sewing machines I have always used have been ancient. I used my moms ancient machine, then I was given an ancient machine. Not saying I didn't appreciate it, they did work for a time. But no more! I am moving into the 21st century! Tomorrow! ;) It is supposed to be delivered tomorrow, and I cannot wait! I'm sure there will be lots of pictures to follow this momentous event :D. Along with the sewing machine pictures, I'll be sure to show you all what kind of sewing projects I've been working on recently :)....more to come soon!

Saturday, January 18, 2014

Bead Bracelets and DIY


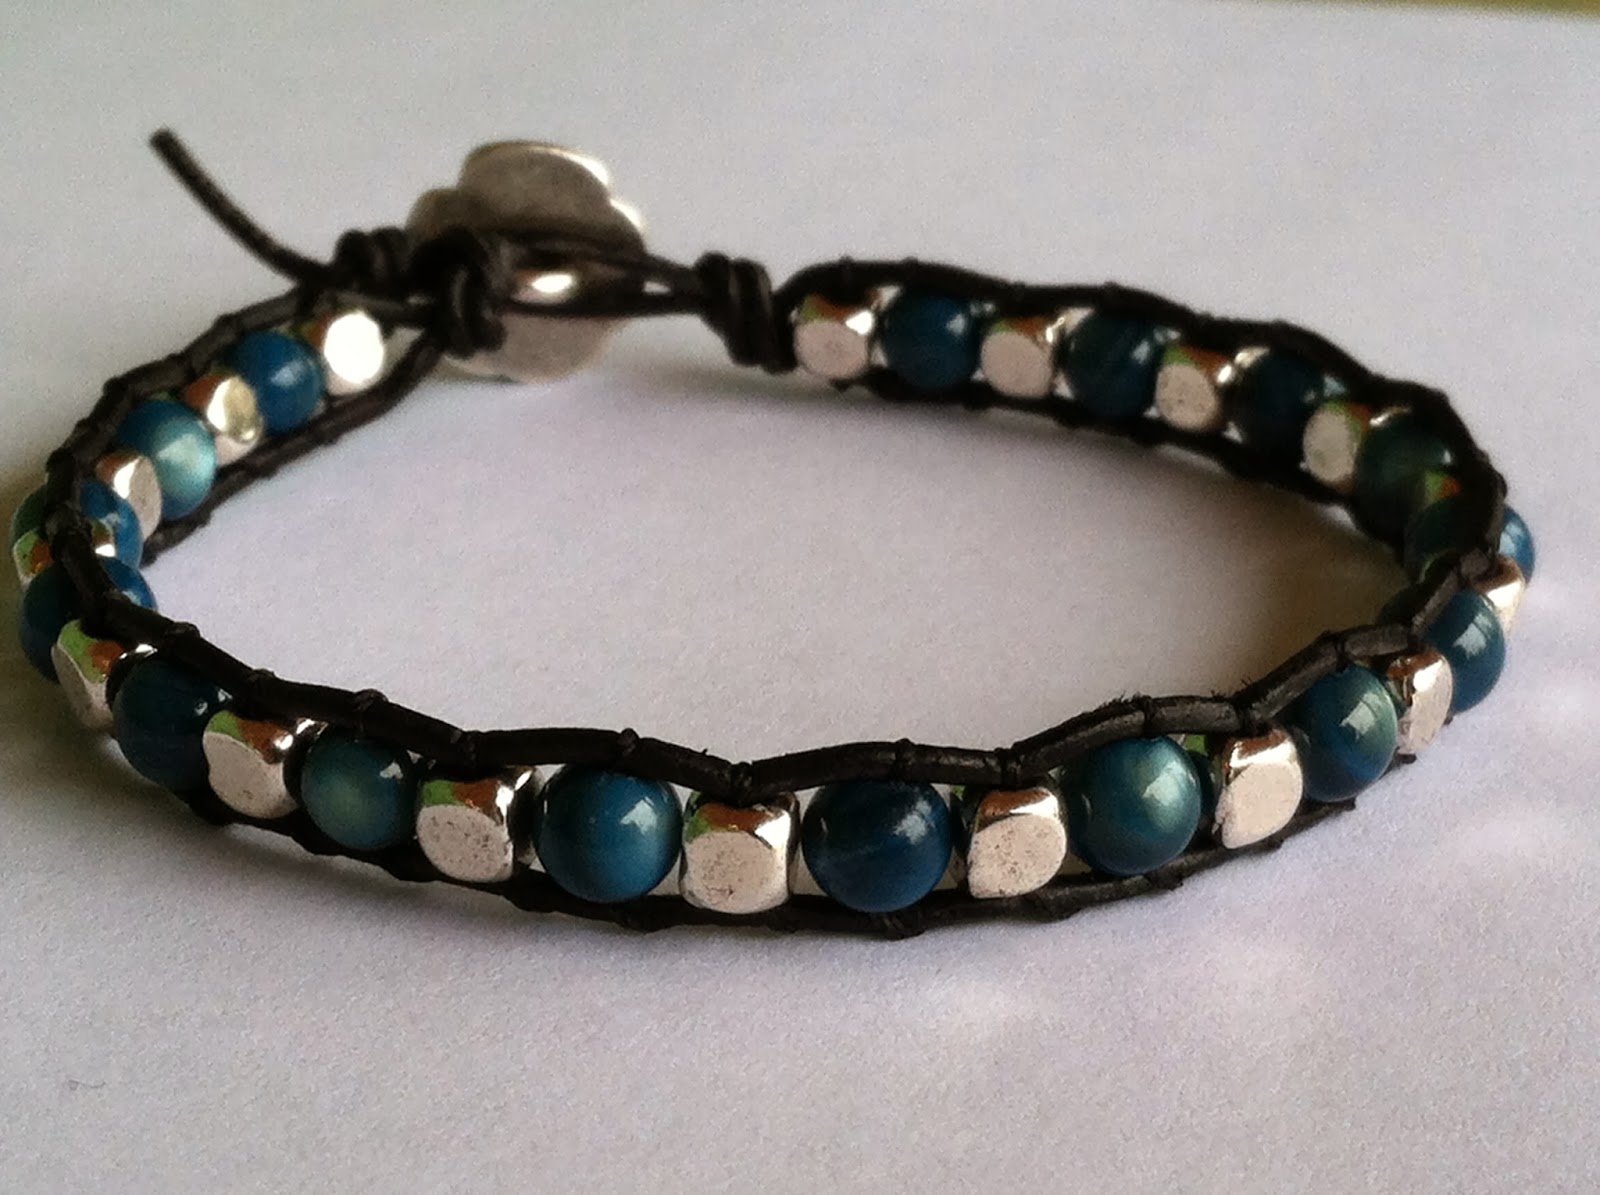
I've recently made some bead bracelets starting with the leather and bead bracelet I made for my friend for Christmas (picture is in my previous post). Going along with that technique I made a couple more bracelets. This bracelet is now available to buy in my Etsy shop SeamsStraight:
https://www.etsy.com/listing/173053593/leather-beaded-metal-button-clasp?ref=listing-shop-header-1

https://www.etsy.com/listing/173053593/leather-beaded-metal-button-clasp?ref=listing-shop-header-1
This bracelet alternates between a round, blue bead and a square, metal bead. For the clasp, I used a metal button in the shape of a flower that is pulled through a loop to close the bracelet. From here I decided to make a wrap bracelet. I think these bracelets are just gorgeous, and this technique is great to use for the wrapped look. This bracelet is also available in my Etsy shop:

https://www.etsy.com/listing/176256323/leather-beaded-metal-button-clasp-wrap?ref=shop_home_active_1

https://www.etsy.com/listing/176256323/leather-beaded-metal-button-clasp-wrap?ref=shop_home_active_1
This bracelet alternates between round, glass, black beads and blue bicone crystal beads. The clasp is a unique round, metal button. I'm thrilled with how both of these bracelets turned out and am tempted to keep them for myself!
 
The last bracelet I've made recently is a super easy bracelet to do and is my DIY for this post :). For my bracelet I used clear, stretchy cord called Stretch Magic that I purchased from Joann Fabrics:
All you have to do with this stuff is basically string your beads and tie a knot, resulting in some beautiful bracelets! This is the bracelet that I have made so far:
 

The large metal beads and square smaller beads were both purchased at Joann Fabrics. The small, red accent bead I purchased at a local bead shop, but any colorful bead can be used to add a splash of color to your bracelet. The metal, 2 hole beads I use are Swarovski Sliders and the square gray beads are hematite stone both available at Joann Fabrics. The way these metal beads are made, I was able to tie the knots in the cord behind one, so the finishing knots are not seen at all when wearing the bracelet.

Enjoy making your own beautiful bracelets and please share if you do! :)

Tuesday, January 14, 2014

2 Great Crochet Patterns for Free


I decided to broaden my crochet horizons and branch out from my usual scarves! I tested out my crochet skills and tried a doily first. I found a free pattern on Craftsy called Aunt Aggie's Trivets. This pattern actually includes 3 different patterns for 3 different sizes of doilies. I made the largest doily and this was my result:

This was the first written pattern I have ever followed, and it went really well. The pattern was super easy to follow and had perfectly clear instructions. I was very excited that my first time reading a pattern turned out to be such a success! I now have this doily on my nightstand and am totally in love with it :).

My next branch out was mittens! Seeing as how we got down to about -25 degrees here recently, these could have come in handy...guess my branching out came just a tad too late, but they'll still come in handy (ha see what I did there? ;) )! The free mitten pattern I found is on crochet me and is called Mrs. Murdock's Mittens. Again this is a written pattern that is super easy to follow. The instructions also include instructions for 3 different sizes of mittens, so that you can get the fit for you (or whomever you'd like to crochet mittens for). I decided to do a color change in my mittens, which is super easy to do, and these are my new mittens:
 
I feel like I've now accomplished more as a crocheter by branching out of my scarf box with these two great patterns. These two free patterns made it simple to be able to branch out with their clear, simple instructions.


Sunday, January 5, 2014

A Handmade Christmas 2013


I hope everyone had a blessed Christmas and New Years! We are now going full throttle into 2014, and I hope that it proves to be a wonderful year for all of you :).

For Christmas this year, most of my friends and family received handmade gifts from me, so I thought I would share what they were with all of you!

My parents are the most difficult people to shop for, though this is mainly my mother. She wants for pretty much nothing, and she doesn't wear jewelry, care about clothes/makeup, etc. So I decided I had to put my crafty thinking cap on, and Pinterest helped a lot with this ;). These are the gifts that I made my parents:


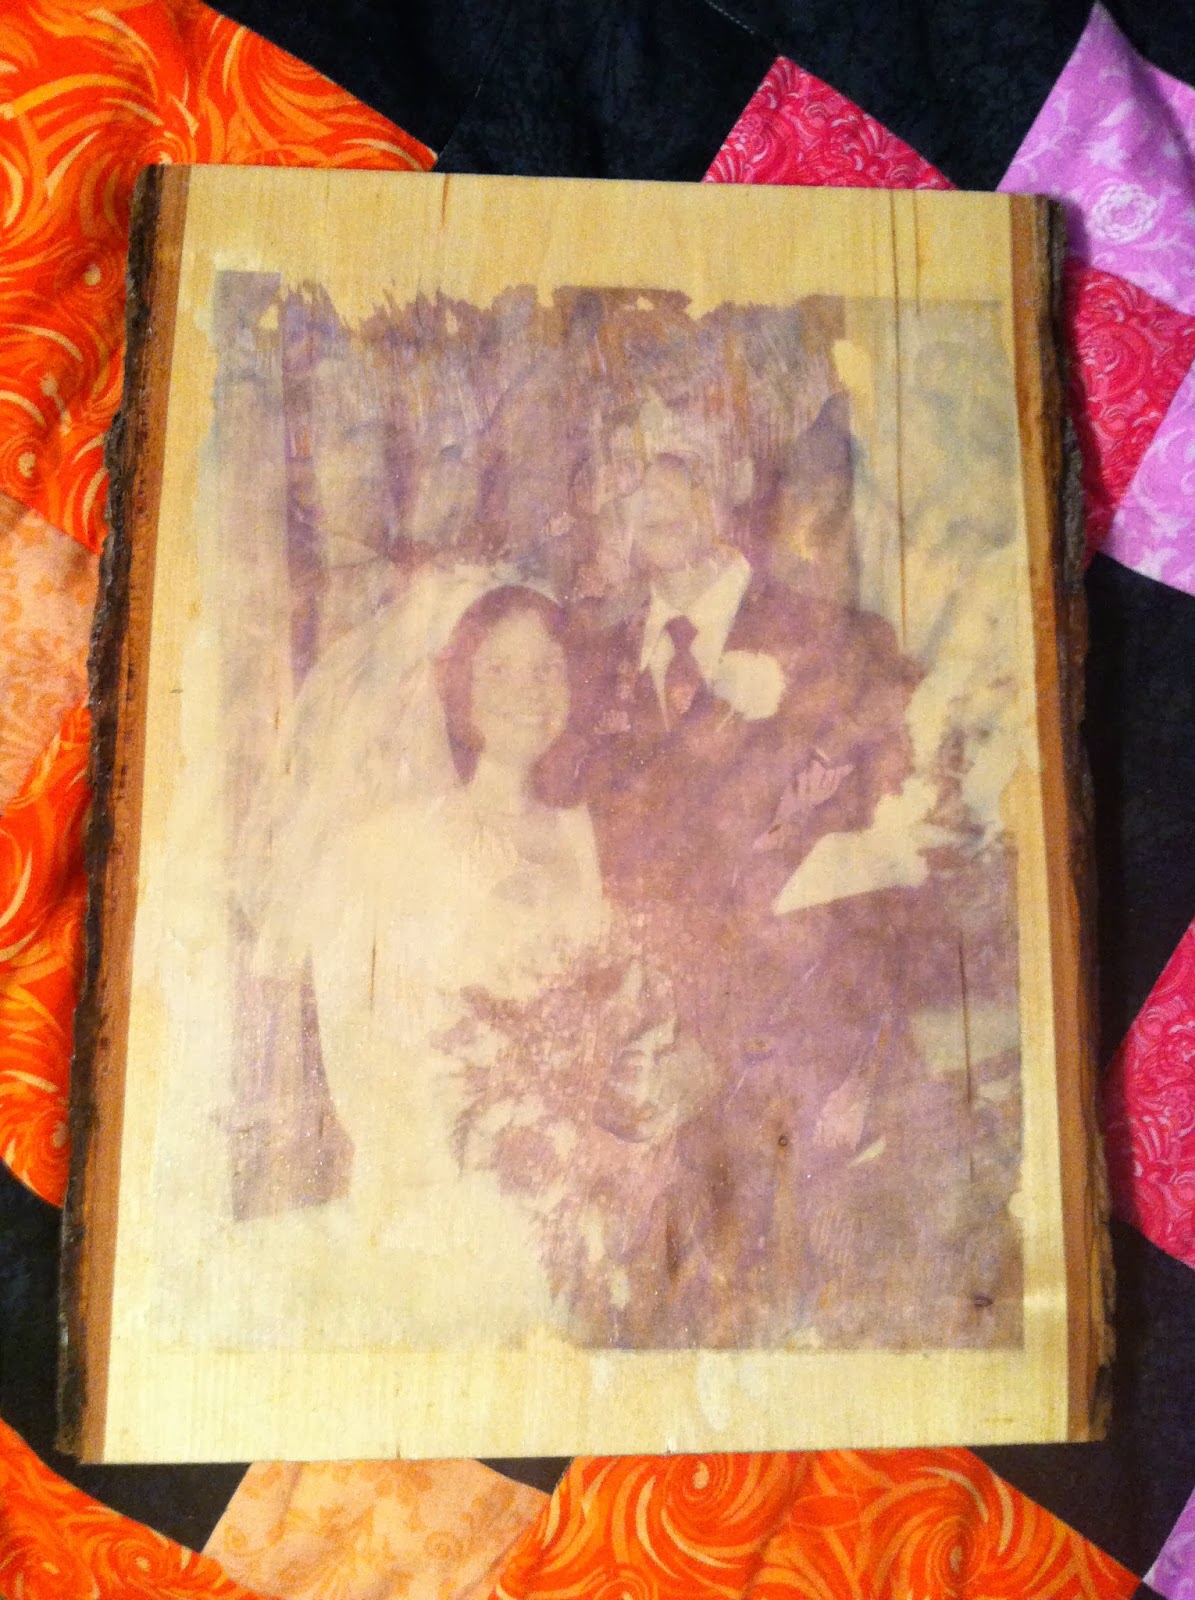
I decided to take one of my parents' wedding photos and transfer it to a piece of wood. For the photo transfer to wood, I used a video tutorial I found on Better Homes and Gardens. The picture turned out to be fairly light on the wood, and there were some white spots where I didn't smooth the picture out well enough with the spoon. But, since this was my first attempt I was pretty happy with the results overall. I'm sure when I attempt this again, it can only improve from here. Since you can still recognize the two people as my parents, I called it a win and wrapped it up ;). As my gel medium, I used Liquitex Gloss Heavy Gel Medium that I picked up from Joann Fabrics. The plate with Bible verses, I made for my mom. This project did not quite go as planned. The picture you see here is the before picture, unfortunately, this plate no longer looks this good. All over Pinterest I saw where it says that if you write on a glass/plate with a Sharpie, then put it in the oven (only one time) at 350 degrees for 30 minutes, the writing is then permanent. Well. Lets just say that I ended up cooking this plate about 5 times, and yeah the words still wiped off :/. I was pretty bummed, because I thought it turned out looking really nice. If anyone has any pointers for improving that process, I am all ears!
 
For my boyfriend, friend, and cousin, they all received a crochet beanie! The pattern for the beanie and bow was the same I used previously; the links can be found in one of my previous posts here. I used thicker yarns than what was used in the video, so I ended up making some modifications of my own so that the hats would be a tad smaller.


For my wonderful aunt, boss and coworkers, they all received crochet scarves:


And lastly, I made a bracelet for another friend. This gift was a long time coming. We had seen a pricey bracelet in a department store, and I told my friend I was pretty sure I could make it. Well it took me a bit to figure it out, but I finally got it! I used a metal button for the clasp, then the bracelet is made of leather, and beads that are sewn in.


I also received a couple awesome handmade gifts this Christmas. From the friend that the bracelet was made for she made me a fabulous wall jewelry display/organizer. She made it out of a frame and a burlap covered peg board. Unique knobs were then put through the burlap and bolted into the pegboard in the back. She also added a metal detail across the top that is perfect for putting earrings through. I absolutely love this, and as you can see I already have it hung and covered in jewelry!!

My supervisor also made me a coaster that is made out of foam and fabric. A pattern is cut into the foam and small pieces of fabric are cut out into the shapes of the pattern and the edges shoved down into the cuts in the foam. This is the awesome result:

 
As you can tell, it was a little busy around these parts getting ready for Christmas! But, being a crafter and making things for the people you love is what it's all about :).