Thursday, October 27, 2016

A Pretty Green Quilt

So as I mentioned previously, one of my good friends also got married in 2015. Instead of freezing January, they were a bit more sensible and chose October :P. So I decided as their wedding gift I'd make them a quilt. I went to handy Pinterest to find some inspiration and this is what I found. My friends favorite color is green, so I went out and bought up some various green fat quarters to give the quilt a scrappy look. For the background I chose a pretty basic fabric that was white with gray line detailing to give it a bit of texture rather than a solid color. And I started writing up some plans:


I'm not sure that I can make sense of these plans now! It's luck that an amazing quilt came out of this chicken scratch. Also for your viewing pleasure is a chinese order amongst the chaos (I swear that was not all just for me!), and a list of herbs that I randomly decided that I wanted to try to grow....side note, they're all dead. Never leave me alone with a plant....But if you can make any sense of that disorder, and love the quilt please give it a try! It's actually pretty simple, just time consuming. And if you have any questions, please feel free to send me a message. From the chaos, this was born:


I am just so in love with this quilt. I was so excited with how it turned out, and my friend and new husband also seemed to love it! For my previous quilts I used the sewing in the ditch technique for the quilting part, but for this quilt since it was a king size, I didn't even want to attempt it. So I went to a small quilt shop in town to ask for suggestions of people around this area that offer long arm quilting services and this is the card I was given:


They're a mother/daughter duo and the nicest people you could meet. I was so happy with the work they did on this quilt, and so fast too! I wish I had more quilts to take to them, buuuut that's a slow process. Though I'm pretty sure I have a couple friends that have found their Mr. Rights. So I may be making a call to them soon!

That's it for now, have a good Friday everyone!

Friday, October 21, 2016

More Party Decorations

Happy Friday everyone!!! So what, you ask, is this crazy lady doing with her Friday evening? Well let me tell you. There is currently a frozen pizza in the oven (Red Baron thin & crispy pepperoni, for inquiring minds everywhere), and I may make a pot of coffee (decaf! calm down). And I hear something....oh yes, that's HGTV calling my name! :P I hope you all are doing whatever makes you happy for your Friday evening!

So back to some more party decorations. Since the awesomeness of my own wedding almost 2 years ago I've still been crafting some party decor. One of my close friends got married last year and I had the honor of being a bridesmaid in her wedding! So for her Bridal Shower I helped out with the decor:


We went with a Fall theme, so I used burlap to create this Falling In Love banner and made a couple strings of leaves. I was so excited with how it turned out! I also made these amazing chocolate chip cookies. This is now my go to chocolate chip cookie recipe, everyone I've made them for just loves them. I do change just a couple things in the recipe, I use less chocolate chips (I know, I'm weird) and I make the cookies smaller than the 1/4 cup suggested size. I did the 1/4 cup the first time I made them, and wow: that's a big cookie!

Another banner I made this past year was for a coworker that retired:


I think the paw print is my favorite part! :) I'm happy to report Becky is thoroughly enjoying retirement! I've also made a couple banners for a coworker that's been helping throw baby showers for her friends. I made these smaller Mama To Be banners to go on the back of the Mama's chairs.


 The top Mama To Be I used card stock paper in the showers colors and the bottom was for a fall theme. And lastly, more banners! Or possibly garland? Whatever you'd liked to call it. These are some strands of fabric and paper circles I made:


The varying blue and gray decorations were for the first shower, and orange and teal for the fall shower. I love both of these color schemes! And with that I'm signing off to go enjoy some HGTV. Hope everyone has a wonderful weekend!


Wednesday, October 19, 2016

So it's been a while....

Wow, so it's been like 2 years!! Obviously I'm not all that good at this blogging thing, but I'm gonna work on that! So I have 2 years of crafty things I've made to get caught up on! Oh my, where to start where to start?! So btw, I'm marrieddddd! I know crazy, right?! And it's actually already been almost 2 years, it's just right around the corner. Time truly flies when you're having fun. So I'm just going to categorize the craftiness and just throw a bunch of pictures out there! This post will entail party items: decorations, invitations, etc. And go!

So as I mentioned previously, I got married! And I made a lotttttt of stuff for our wedding just to make it more affordable for us. Here are some crafty things that helped make our day fantastic:


 I used an invitation kit that I actually purchased from Wal-Mart to make our invitations. I printed everything, made the initial card and wrapped the whole thing with ribbon to keep it together.


This is a picture mash up of our wedding decor! I cut tulle into squares to gather up a few mints then tied it off with a bit of string. I used a label template I found here on Pinterest that I cut out and also tied into the string. The bookmark program I created myself in a word document. The fonts were free fonts I found through Pinterest. The wine glasses I totally thrifted for! You can find cheap wine glasses anywhere, it's a very affordable and I think elegant look. The mirror centerpiece and artificial flower heads I purchased off ebay in bulk. The Mr. and Mrs. are wood that my dad helped me make. I printed the words out, traced them onto wood and my dad then cut them out. Some spray paint, and walah! Beautiful :). Also in this picture is the little ring pillow that I sewed. I used a button shaped like a snowflake (our theme if you haven't noticed, fitting since it was in January!) to sew in the center and then used a ribbon to tie the rings next to the snowflake. And last but not least, the table numbers that I made. Card stock paper, some layering of lace and ribbon with a bit of bling, and lots of glue to hold it all together! So that's our wedding in a nut shell! At least the decor parts ;).


It was an amazing day :).
1-17-2015


Wednesday, September 17, 2014

Making a Home


All of my current projects have been to attempt making my apartment look less like a college dorm room :P. I've been doing projects like painting (I'm not all too artistic, so this was a daring task for me) and my next project is sewing curtains. Pinterest is a glorious place when you're looking for some home DIY projects, let me tell you. The painting project that I attempted can be found here on the REFINERY29 blog. They give a list of all the materials needed, and show step by step how to undertake this project. Here is my result for my living room:


 I wasn't so sure about it when I was done, but the more I look at it, the more I like it. It's certainly not perfect, but it'll do. And since it took about 2 hours to put all the painters tape on, I definitely will not be scratching it!

I found another simple idea for a painting on Pinterest that I decided to use for my bathroom. It was only a picture I found, but all you have to do is use painters tape to make a couple X's on a canvas. Then just paint around the tape, let it dry and pull the tape off. Voila! You get this:


My next project is to make some curtains for my living room. I found this fantastic fabric at Joann Fabrics by Patty Young:


I'm trying to keep the color scheme in my living room to blues and oranges (though I just realized that according to Joann's website, they say this fabric has red flowers; apparently I'm color blind, I could have sworn that they were a bright orange, whoops).

In other news, I forgot to mention that I bought a new sewing machine!!! I love love *love* it! It's a Janome DC5100. I purchased mine off of Amazon where my link goes to; being a prime member, free shipping is a wonderful perk.

I have a friend that is getting married in a couple weeks! I was honored to be invited to her bridal shower and with my new sewing machine, I was able to make these for her:


Pot holders are always a useful gift, and personalize them and they become even better :). I'm looking forward to being a part of their special day in just a little over a week!

And for my final thought, I'm going shopping for a wedding dress tomorrow!!!!!! I'm so excited!! Wish me luck! :)

Tuesday, July 29, 2014

I'm Not Dead!!


Sooo, it's been a while....like quite a while. You know how it goes; life gets busy, the projects start backing up. Well, the blog project is definitely one that slipped. For that I apologize to all of you out there that missed my posts (yes, we're going to pretend that you did to make me feel better).

So you ask me, "What have you been up to that kept you away from your blog?". Well let me tell you...


I'M ENGAGED!!!!!

That's right folks, it finally happened! I am currently engaged to my best friend, and will soon be proud to call myself his wife (well soonish). It's a tad weird and confusing at the moment since we live an hour and half away from each other, so one person has to move their entire life. But, it is being configured and it's super exciting and I'm super uber happy :D. The other big change is that I will be moving! I have been living with my wonderful parents that allowed their college graduate to come back home and mooch off of them ;), but I'll be moving into my own apartment in 8 days! Yep, I really just said 8 days. So a lot is changing in my world...but don't worry, the crafting is still happening! And now I have more things to craft because I have an apartment and a wedding to prepare for!!

Here are some projects that I've been working on...


This is a dresser that I repainted. Before being painted it looked like this. This is a different shape, but you get the idea. I have an entire set of this French Provincial furniture in my room, and I've decided to repaint them to give them some new life. This is the only piece that I have completed so far, I still have a larger chest of drawers and my bed to do. Some tutorials that I found to help in my painting ventures are LifeLoveDIY and Centsational Girl. For mine I did prime it first, and I used the clear wax at the end for sealing.

A project that I completed is a doily made with lace size string. If you haven't seen the crochet hook used for lace string, check it out, it will blow your mind. I made this doily for my fiance's mom for her birthday. It took months and months to make, but I absolutely love how it turned out!!! And so did she :).


Another lace doily that I'm still working on is for my mom. I've been working on it for quite some time, and it's still going to take quite a bit more time. When it's done it will have a diameter of 26 inches. The doily above has a diameter of 14 inches....The patterns for both of these doilies is in the Crochet World Spring 2014 Edition. For some reason I cannot find a link to that edition, very strange...


And the note I will leave you with....I bought a new sewing machine!!! Like *new* new!! The sewing machines I have always used have been ancient. I used my moms ancient machine, then I was given an ancient machine. Not saying I didn't appreciate it, they did work for a time. But no more! I am moving into the 21st century! Tomorrow! ;) It is supposed to be delivered tomorrow, and I cannot wait! I'm sure there will be lots of pictures to follow this momentous event :D. Along with the sewing machine pictures, I'll be sure to show you all what kind of sewing projects I've been working on recently :)....more to come soon!

Saturday, January 18, 2014

Bead Bracelets and DIY


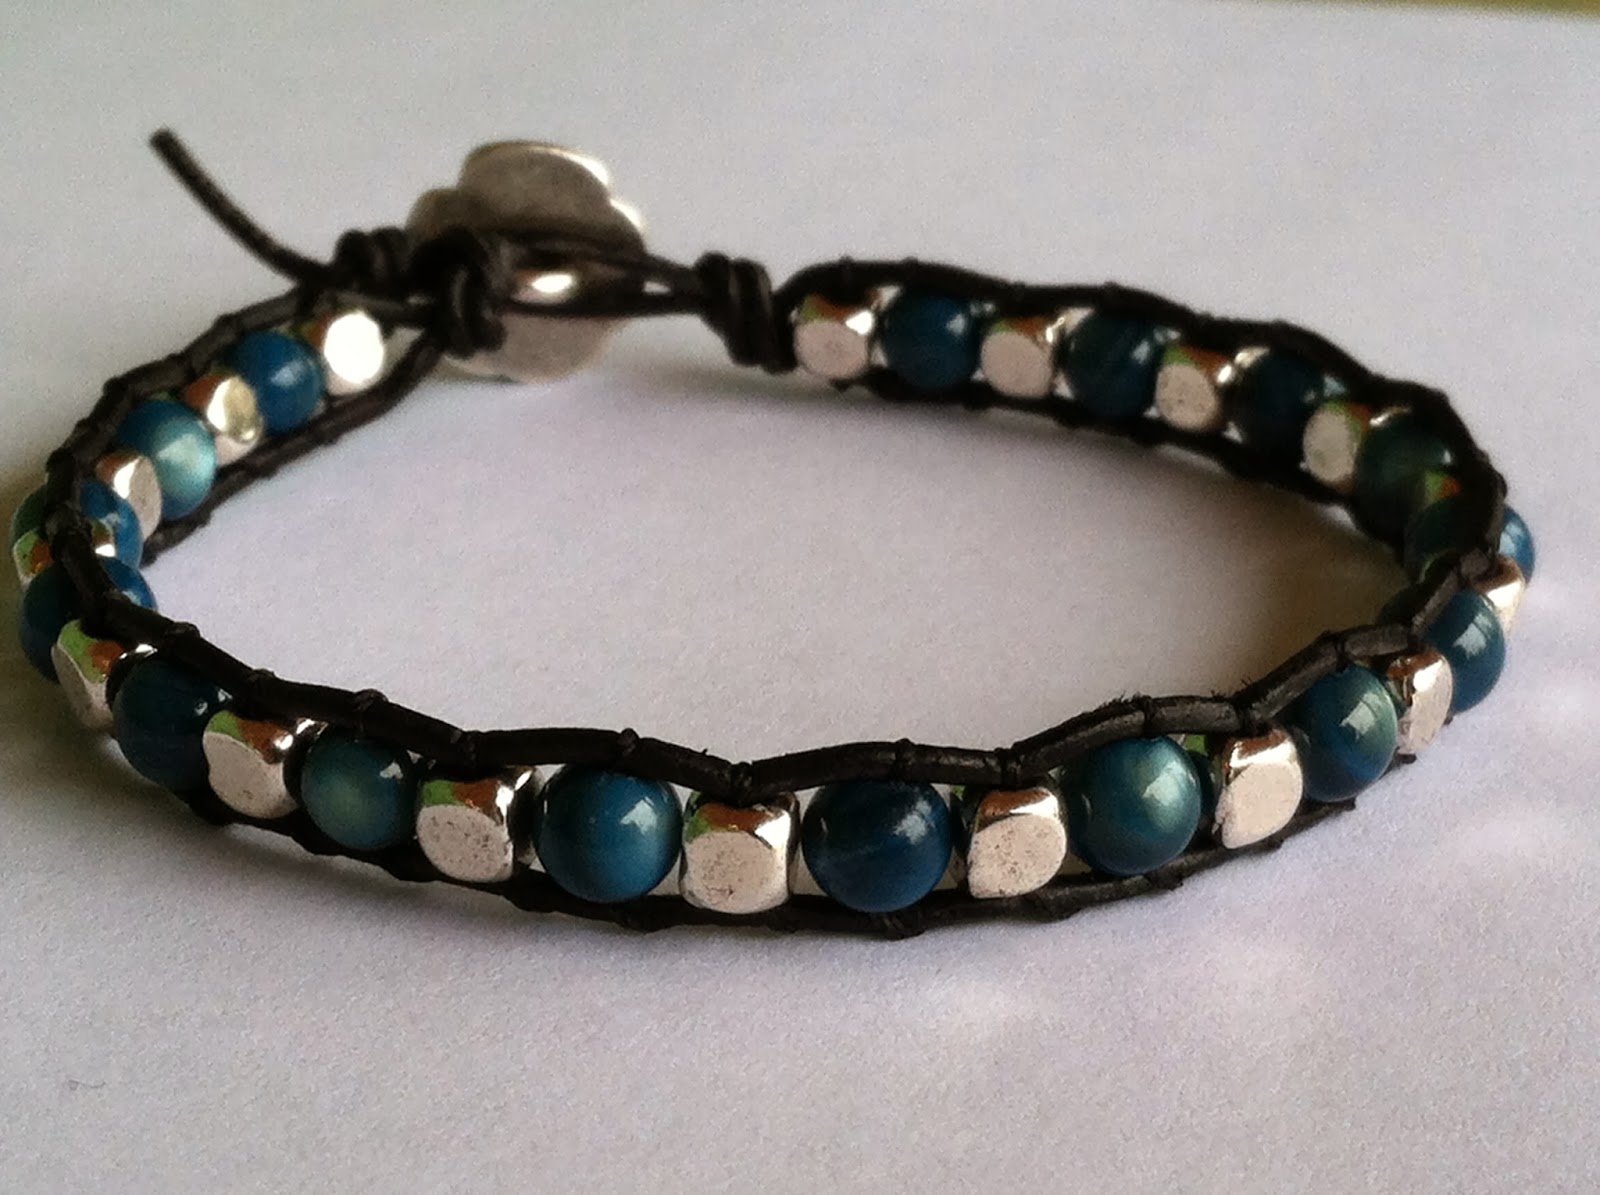
I've recently made some bead bracelets starting with the leather and bead bracelet I made for my friend for Christmas (picture is in my previous post). Going along with that technique I made a couple more bracelets. This bracelet is now available to buy in my Etsy shop SeamsStraight:
https://www.etsy.com/listing/173053593/leather-beaded-metal-button-clasp?ref=listing-shop-header-1

https://www.etsy.com/listing/173053593/leather-beaded-metal-button-clasp?ref=listing-shop-header-1
This bracelet alternates between a round, blue bead and a square, metal bead. For the clasp, I used a metal button in the shape of a flower that is pulled through a loop to close the bracelet. From here I decided to make a wrap bracelet. I think these bracelets are just gorgeous, and this technique is great to use for the wrapped look. This bracelet is also available in my Etsy shop:

https://www.etsy.com/listing/176256323/leather-beaded-metal-button-clasp-wrap?ref=shop_home_active_1

https://www.etsy.com/listing/176256323/leather-beaded-metal-button-clasp-wrap?ref=shop_home_active_1
This bracelet alternates between round, glass, black beads and blue bicone crystal beads. The clasp is a unique round, metal button. I'm thrilled with how both of these bracelets turned out and am tempted to keep them for myself!
 
The last bracelet I've made recently is a super easy bracelet to do and is my DIY for this post :). For my bracelet I used clear, stretchy cord called Stretch Magic that I purchased from Joann Fabrics:
All you have to do with this stuff is basically string your beads and tie a knot, resulting in some beautiful bracelets! This is the bracelet that I have made so far:
 

The large metal beads and square smaller beads were both purchased at Joann Fabrics. The small, red accent bead I purchased at a local bead shop, but any colorful bead can be used to add a splash of color to your bracelet. The metal, 2 hole beads I use are Swarovski Sliders and the square gray beads are hematite stone both available at Joann Fabrics. The way these metal beads are made, I was able to tie the knots in the cord behind one, so the finishing knots are not seen at all when wearing the bracelet.

Enjoy making your own beautiful bracelets and please share if you do! :)

Tuesday, January 14, 2014

2 Great Crochet Patterns for Free


I decided to broaden my crochet horizons and branch out from my usual scarves! I tested out my crochet skills and tried a doily first. I found a free pattern on Craftsy called Aunt Aggie's Trivets. This pattern actually includes 3 different patterns for 3 different sizes of doilies. I made the largest doily and this was my result:

This was the first written pattern I have ever followed, and it went really well. The pattern was super easy to follow and had perfectly clear instructions. I was very excited that my first time reading a pattern turned out to be such a success! I now have this doily on my nightstand and am totally in love with it :).

My next branch out was mittens! Seeing as how we got down to about -25 degrees here recently, these could have come in handy...guess my branching out came just a tad too late, but they'll still come in handy (ha see what I did there? ;) )! The free mitten pattern I found is on crochet me and is called Mrs. Murdock's Mittens. Again this is a written pattern that is super easy to follow. The instructions also include instructions for 3 different sizes of mittens, so that you can get the fit for you (or whomever you'd like to crochet mittens for). I decided to do a color change in my mittens, which is super easy to do, and these are my new mittens:
 
I feel like I've now accomplished more as a crocheter by branching out of my scarf box with these two great patterns. These two free patterns made it simple to be able to branch out with their clear, simple instructions.