Saturday, January 18, 2014

Bead Bracelets and DIY


I've recently made some bead bracelets starting with the leather and bead bracelet I made for my friend for Christmas (picture is in my previous post). Going along with that technique I made a couple more bracelets. This bracelet is now available to buy in my Etsy shop SeamsStraight:
https://www.etsy.com/listing/173053593/leather-beaded-metal-button-clasp?ref=listing-shop-header-1

https://www.etsy.com/listing/173053593/leather-beaded-metal-button-clasp?ref=listing-shop-header-1
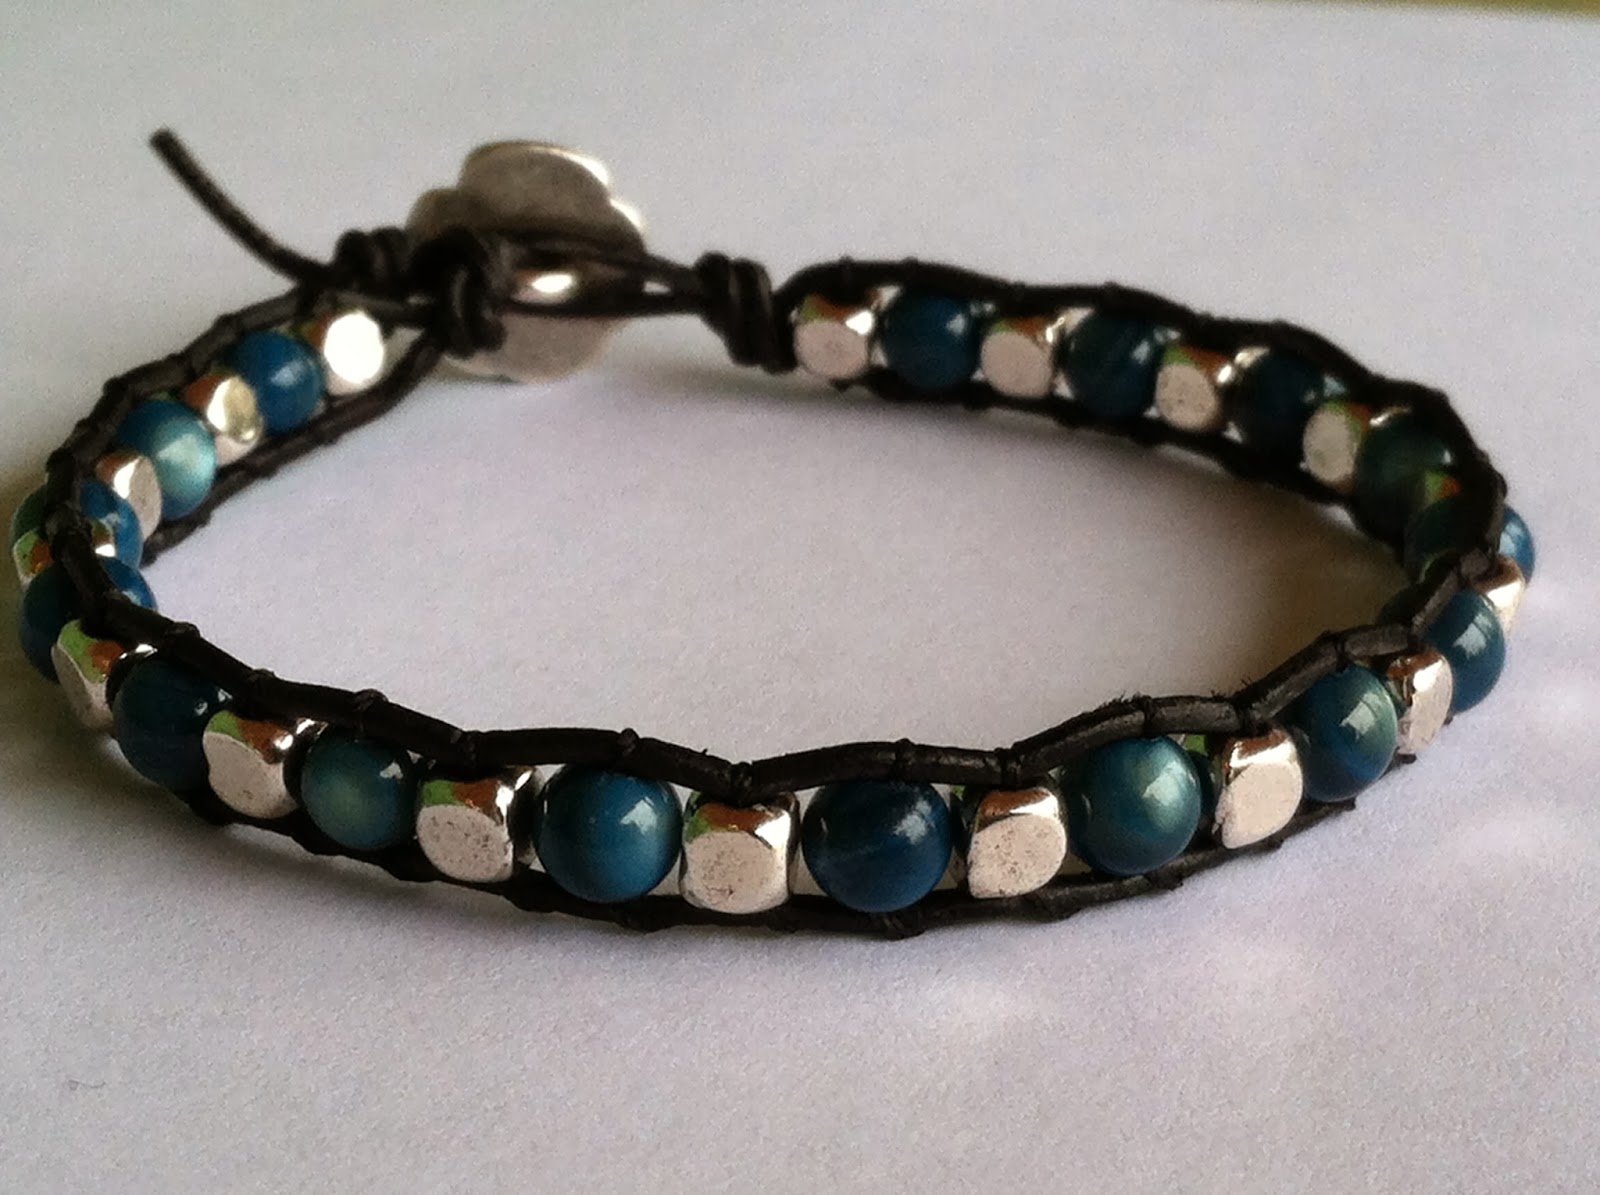
This bracelet alternates between a round, blue bead and a square, metal bead. For the clasp, I used a metal button in the shape of a flower that is pulled through a loop to close the bracelet. From here I decided to make a wrap bracelet. I think these bracelets are just gorgeous, and this technique is great to use for the wrapped look. This bracelet is also available in my Etsy shop:

https://www.etsy.com/listing/176256323/leather-beaded-metal-button-clasp-wrap?ref=shop_home_active_1

https://www.etsy.com/listing/176256323/leather-beaded-metal-button-clasp-wrap?ref=shop_home_active_1
This bracelet alternates between round, glass, black beads and blue bicone crystal beads. The clasp is a unique round, metal button. I'm thrilled with how both of these bracelets turned out and am tempted to keep them for myself!
 
The last bracelet I've made recently is a super easy bracelet to do and is my DIY for this post :). For my bracelet I used clear, stretchy cord called Stretch Magic that I purchased from Joann Fabrics:
All you have to do with this stuff is basically string your beads and tie a knot, resulting in some beautiful bracelets! This is the bracelet that I have made so far:
 

The large metal beads and square smaller beads were both purchased at Joann Fabrics. The small, red accent bead I purchased at a local bead shop, but any colorful bead can be used to add a splash of color to your bracelet. The metal, 2 hole beads I use are Swarovski Sliders and the square gray beads are hematite stone both available at Joann Fabrics. The way these metal beads are made, I was able to tie the knots in the cord behind one, so the finishing knots are not seen at all when wearing the bracelet.

Enjoy making your own beautiful bracelets and please share if you do! :)

Tuesday, January 14, 2014

2 Great Crochet Patterns for Free


I decided to broaden my crochet horizons and branch out from my usual scarves! I tested out my crochet skills and tried a doily first. I found a free pattern on Craftsy called Aunt Aggie's Trivets. This pattern actually includes 3 different patterns for 3 different sizes of doilies. I made the largest doily and this was my result:

This was the first written pattern I have ever followed, and it went really well. The pattern was super easy to follow and had perfectly clear instructions. I was very excited that my first time reading a pattern turned out to be such a success! I now have this doily on my nightstand and am totally in love with it :).

My next branch out was mittens! Seeing as how we got down to about -25 degrees here recently, these could have come in handy...guess my branching out came just a tad too late, but they'll still come in handy (ha see what I did there? ;) )! The free mitten pattern I found is on crochet me and is called Mrs. Murdock's Mittens. Again this is a written pattern that is super easy to follow. The instructions also include instructions for 3 different sizes of mittens, so that you can get the fit for you (or whomever you'd like to crochet mittens for). I decided to do a color change in my mittens, which is super easy to do, and these are my new mittens:
 
I feel like I've now accomplished more as a crocheter by branching out of my scarf box with these two great patterns. These two free patterns made it simple to be able to branch out with their clear, simple instructions.


Sunday, January 5, 2014

A Handmade Christmas 2013


I hope everyone had a blessed Christmas and New Years! We are now going full throttle into 2014, and I hope that it proves to be a wonderful year for all of you :).

For Christmas this year, most of my friends and family received handmade gifts from me, so I thought I would share what they were with all of you!

My parents are the most difficult people to shop for, though this is mainly my mother. She wants for pretty much nothing, and she doesn't wear jewelry, care about clothes/makeup, etc. So I decided I had to put my crafty thinking cap on, and Pinterest helped a lot with this ;). These are the gifts that I made my parents:


I decided to take one of my parents' wedding photos and transfer it to a piece of wood. For the photo transfer to wood, I used a video tutorial I found on Better Homes and Gardens. The picture turned out to be fairly light on the wood, and there were some white spots where I didn't smooth the picture out well enough with the spoon. But, since this was my first attempt I was pretty happy with the results overall. I'm sure when I attempt this again, it can only improve from here. Since you can still recognize the two people as my parents, I called it a win and wrapped it up ;). As my gel medium, I used Liquitex Gloss Heavy Gel Medium that I picked up from Joann Fabrics. The plate with Bible verses, I made for my mom. This project did not quite go as planned. The picture you see here is the before picture, unfortunately, this plate no longer looks this good. All over Pinterest I saw where it says that if you write on a glass/plate with a Sharpie, then put it in the oven (only one time) at 350 degrees for 30 minutes, the writing is then permanent. Well. Lets just say that I ended up cooking this plate about 5 times, and yeah the words still wiped off :/. I was pretty bummed, because I thought it turned out looking really nice. If anyone has any pointers for improving that process, I am all ears!
 
For my boyfriend, friend, and cousin, they all received a crochet beanie! The pattern for the beanie and bow was the same I used previously; the links can be found in one of my previous posts here. I used thicker yarns than what was used in the video, so I ended up making some modifications of my own so that the hats would be a tad smaller.


For my wonderful aunt, boss and coworkers, they all received crochet scarves:


And lastly, I made a bracelet for another friend. This gift was a long time coming. We had seen a pricey bracelet in a department store, and I told my friend I was pretty sure I could make it. Well it took me a bit to figure it out, but I finally got it! I used a metal button for the clasp, then the bracelet is made of leather, and beads that are sewn in.


I also received a couple awesome handmade gifts this Christmas. From the friend that the bracelet was made for she made me a fabulous wall jewelry display/organizer. She made it out of a frame and a burlap covered peg board. Unique knobs were then put through the burlap and bolted into the pegboard in the back. She also added a metal detail across the top that is perfect for putting earrings through. I absolutely love this, and as you can see I already have it hung and covered in jewelry!!

My supervisor also made me a coaster that is made out of foam and fabric. A pattern is cut into the foam and small pieces of fabric are cut out into the shapes of the pattern and the edges shoved down into the cuts in the foam. This is the awesome result:

 
As you can tell, it was a little busy around these parts getting ready for Christmas! But, being a crafter and making things for the people you love is what it's all about :).


Monday, December 23, 2013

Christmas Blessings


I was messaged by another blogger, Heather Von St. James, and asked to share her incredible story of surviving mesothelioma. Heather's story can be found on The Mesothelioma Cancer Alliance Blog. In 2005, Heather was diagnosed with mesothelioma only 3 months after giving birth to her child and told that she would have 15 months to live. Heather and her family did not accept this answer, so embarked on a mission to find a solution. Heather is now a 7 year survivor of mesothelioma with her mission now being to share her amazing story to give hope to those going through similar situations. Heather is living her life to the fullest, and is thankful of this second chance that she has been given.

It's December 23rd, the day that most people are rushing around buying last minute presents and food. Wondering if this person is buying me something-so do I need to buy them something? For a lot of people this time of year has just become stressful and all about materialistic things. (Though, I'm not saying I'm perfect and that I'm not making a trip to the store later to pick up some of those last minute items). But, I want to take a few minutes to take a step back from the rushing and the stress to recognize that the reason for this holiday is because Jesus Christ, my Savior, was born. He is the reason that miracles happen like with Heather, and the reason why we are so blessed to have things to be thankful for. His love for us is what makes all things possible.

In my life, I have numerous things to be thankful for. I have a loving family, boyfriend and friends. I love my job, supervisor, and coworkers. I've been blessed with skills like quilting and crocheting that I can share with all the people I love. I'm truly grateful for the life I've been given. I know that through anything I have people around me that care for me and will help me through any situation. And, I know that in the situations where there is too much stacked against me, I have a God that is a Waymaker and carries me through. My mother went through two surgeries to remove thyroid cancer from her body; she then went through two more to have both of her knees replaced. She's still going through a medical situation that is being monitored, but I know that there isn't going to be anything to be concerned about. My family has placed this in God's hands, and He is more than capable. I have a blessed life that I am thankful for every single day, and Christmas, the day that Jesus came into this world to be our Savior, is the reason that it is possible.

"And the angel said unto them Fear not: for, behold, I bring you good tidings of great joy, which shall be to all people. For unto you is born this day in the city of David a Saviour, which is Christ the Lord. And this shall be a sign unto you; Ye shall find the babe wrapped in swaddling clothes, lying in a manger. And suddenly there was with the angel a multitude of the heavenly host praising God, and saying, Glory to God in the highest, and on earth peace, good will toward men." Luke 2: 10-14

May God bless you and your family during this holiday season. Merry Christmas :)


Wednesday, December 18, 2013

Crochet Hat and Infinity Scarf with Free Pattern


I completed a wonderful crochet set with hat and infinity scarf :). This is my first crochet hat and I think it turned out absolutely beautiful :). For both the hat and scarf I used Lion Brand Heartland Yarn from Joann Fabrics and used the suggested needle size for the yarn (which is a J). The colors I used were Yellowstone and Grand Canyon. This yarn is so soft and comes in such beautiful colors, I love it. I followed a YouTube video by LOVE4NAILS to complete the beanie hat. This was the same person that made the video I followed to do my infinity scarf I made previously. The how-to video for this hat, "How To Crochet a Beanie Hat Step by Step" can be found on YouTube; she does a great job of explaining each step and showing you exactly what she's doing. A couple alterations I made for my hat is that I have one less row than what she says in her video. I tried on my hat several times while making it to get the correct fit for me, and it ended up being one row less than the video says. Another alteration I made was, instead of only adding one row of color at the end of the hat, I made mine two rows for the trim. I like the slightly thicker trim you get with two rows of color rather than the one.


Once I finished the hat, I decided it was a little on the plain side, so I went on a Pinterest search to find a simple crochet bow to add for a little pizazz ;). This was the bow I found on Unravelled Thredz. She provides a free pattern and step by step pictures to follow, and it's simple as can be!

I think I may have used thicker yarn than what was used in the bow pattern. So, instead of a chain of 37, I did a chain of about 28. I then only did about 7-8 rows of sc’s. I wanted my bow to be a good size, but didn’t want it to overpower the entire hat. My bow ended up being 4 1/2” x 2”.

For the infinity scarf, I modified and added to a pattern in one of my crochet books to get this. A rough summary of my pattern is to start with a chain of ~120; you can pull the chain taught and wrap around your neck to get an approximate feel if your chain is long enough. The two ends are then connected, which is shown in this LOVE4NAILS how-to video here. The first 3 rows are sc’s. For crocheting around your loop, crochet around and when you get back to the beginning connect the end of your row to the beginning like what was done for connecting your chain ends. Then for the sc you chain 1 as usual, turn your work and move on to the next row of sc’s. When the 3 rows of sc’s are complete, dc is used for the pattern in the center of the scarf. 


When your sc rows are complete and you have attached the end of your 3rd row to the beginning of your 3rd row, you then need to chain 3 to make a start for the dc’s. Then do 4 dc’s and on the 4th dc, put a chain of 2. You then skip 2 spaces in your base and put your next dc in the 3rd space (the chain of 2 you added to the 4th dc accommodates for the 2 spaces you skip on your base). Then do 4 dc’s, again adding a chain of 2 to the 4th. Skip 2 spaces in the base and start the next 4 dc’s in the 3rd space. You’ll continue this process until you get all the way back to your beginning where again you attach the end of the row to the beginning. If you just ended your row with 4 dc’s, then you will need to chain 5, this gives your chain of 3 to accommodate the dc and then the chain of 2 to accommodate the 2 spaces in your base you will need to skip to continue the pattern. If you ended with a space, you only need to do the usual chain of 3. 

Starting next row with 4 dc’s:
The chain of 3 counts as 1, turn your work then add 2 dc’s into the hole left by the pattern in the base row. The 4th dc goes into the space above the first dc of the set in the base. Add a chain of 2 to the 4th dc and continue the process.

Starting next row with a space:
Make your chain of 5, skip 2 spaces in the base and start your 4 dc’s. Your first dc will go into the space above the last dc in the base, the next 2 dc’s go into the hole left by the pattern in the base row, then the 4th dc goes into the space above the first dc in the next set of the base. Add a chain of 2 to the 4th dc and continue the process.

In my scarf I did 5 rows of the dc pattern. Depending on how wide you want your scarf will determine how many rows you should do. After my dc rows, I then completed another 3 rows of sc to complete the border of the dc pattern.

If you’d like more description of how this was done, or have any questions, just let me know and I’d be happy to elaborate and help you with your own scarf :).


Monday, December 9, 2013

Conclusion to the Senior Christmas Scarf Project


The scarves are on the next step of the journey to their forever homes! This past week my boyfriend dropped off the scarves at the Center for Seniors!! The final number of scarves was 35! That is a lot more than I was expecting. I had help and donations from a lot of wonderful people, and because of this, 35 seniors are going to get a handmade scarf for Christmas :).

When my boyfriend dropped of the scarves, his previous supervisor at the Center for Seniors was so excited to see the variety and work that went into this project. My boyfriend, the awesome person that he is, told her that I put my heart and soul into this project. Which I did, and I feel that the people that helped me did as well. I can't thank you all enough for taking your time to make someones Christmas a little warmer :).

For Christmas, the Center for Seniors do what they call a Basket of Love. They place a variety of items in these ~400 baskets and they're delivered to the seniors around the Muskingum County area that the Center for Seniors serves on a daily basis.These scarves are going to be included in these baskets. Therefore, only 35 baskets will have scarves, but that's 35 more than if we hadn't done any :).

Here are all of the wonderful scarves that were donated:


Sunday, November 24, 2013

Senior Scarf Christmas

I now have 26 scarves for the Senior Christmas Scarf Project!! That's right, no stuttering here, I did say 26!! A couple wonderful women, that work in my building, are responsible for 7 of those scarves! These are the beautiful scarves that they donated:


I've completed 5 more scarves myself since my last post :). These are the scarves I crocheted:


I'ts getting very close to when the scarves will need to be delivered to the Center for Seniors, so there isn't much longer to complete more scarves! I'm very happy with the number I've been able to accumulate and know that it will make someone's Christmas just a bit brighter and warmer ;).
 
I also came up with a new idea to go along with the scarves. Since these scarves will be Christmas gifts, I wanted to spread the joy of Christmas, and it's meaning, just a bit more. I decided that I'm going to use Business Card stock paper to put Bible verses on. I'm going to punch a hole in the corner of the business card and tie a card to each scarf. My wonderful supervisor already had some Business Card stock paper that she is letting me use so that I didn't have to buy any!


I greatly appreciate all of the donations I have received for this project! I'm so excited and thrilled that these scarves are almost on their way to their new homes :). I have to have all of this done by next weekend so that I can pass all of this along to my boyfriend to drop off to the Center for Seniors next week! If I'm not back this week, I hope everyone has a wonderful Thanksgiving!!